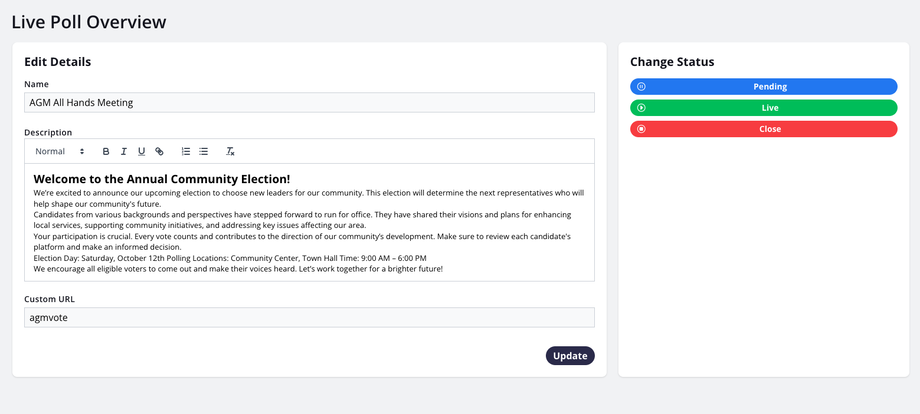
Getting Started with live polling - Overview page
Getting Started with Votely Live polling
Step 1: Creating Your First Poll
To begin using live polling, follow these steps to set up your first poll and make it ready for participants:
1. Poll Title
- Choose a title that clearly describes your poll's purpose. This title will appear in your account dashboard and is visible to participants, helping them identify the poll easily.
- Example Titles: *Employee Feedback Survey*, *Product Launch Opinions*, or Training Session Check-In.
2. Description
- Add a brief description to provide additional context about your poll. This can include instructions for participants, a short overview of the poll’s goals, or any other relevant details.
- Example Descriptions:
- *“Please share your honest feedback on today’s training.”*
- *“This poll will gather your thoughts on our new product launch.”*
3. Custom URL
- Create a unique and memorable URL for your poll. This custom URL will serve as a “nickname” or an easy-to-share link that participants can use to quickly access the poll.
- Note: URLs can usually be edited for a limited time, so double-check the spelling and wording before sharing.
Poll Status
Once you have created your poll, you’ll see it listed on your overview page with a Status label indicating its current state. There are three primary statuses:
1. Live
- A poll in “Live” status is active and available for participants to access and respond to. This status indicates that the poll is currently open and collecting responses in real-time.
- Tip: Keep an eye on live polls to monitor responses and, if necessary, make any real-time adjustments to your presentation or content.
2. Pending
- A “Pending” status indicates that the poll has been created but is not yet active. This allows you to prepare your poll in advance and launch it at the optimal time.
- Use Case: Set up multiple polls before an event and activate them as needed during different segments.
3. Closed
- When a poll is marked as “Closed,” it is no longer accessible to participants for responses. This status typically applies after the poll has fulfilled its purpose, allowing you to end data collection.
- Tip: You can still view results from closed polls in your dashboard and export data for further analysis.
Editing and Managing Polls
In addition to creating your poll, you have the ability to manage its settings through the following features:
- Edit Poll Details: Update the title, description, or custom URL if any changes are needed.
- Change Poll Status: Manually toggle between “Live,” “Pending,” and “Closed” to control when your poll is active.
- View Poll Results: Access real-time responses and insights from participants as they submit their feedback.
Additional Tips for Success
- Preview Your Poll: Before launching, use the preview option to see how the poll will appear to participants. This ensures all settings are correct and that the title, description, and URL are clear.
- Share the URL: Once your poll is ready, share the custom URL through email, chat, or a presentation slide, making it easy for participants to join.
- Monitor Engagement: While your poll is live, keep track of responses and audience engagement. This feedback can guide any adjustments during the event.


